Pages

Showing posts with label walls. Show all posts

Tuesday, February 28, 2012

Paper thin walls.

On a recent trip to see my friend Kim, from Serendipty, we visited a local antique store in Clarendon Hills, Illinois. One of the vignettes in the store was all black and white, and the wall had been covered in newspapers, scrapbook paper and other odd pieces of memorbilia. I fell in love with the wall and decided to duplicate in my stairwell. I knew I'd have to alter it a bit, because I didn't want all black/white/gray colors. I needed it to be more on the tan/cream/brown side of the color wheel.

You might remember that last year I painted my family room two shades of tan, but when I got to the basement stairwell, I never finished the bottom half. Partly because I ran out of steam, and partly because I couldn't decide what to do on those walls. I contemplate wallpapering the bottom half, but stewed about what paper to buy for weeks and in the end, I never did anything. And now a whole year has passed and it remains unpainted! The yellow bottom you see here is the old wall color--and that's what I wanted to cover.


The walls are covered in wood paneling, so I wasn't sure I wanted to permanently adhere layers of paper to it. After much thought I decided to line the walls first with brown Kraft paper. Then I could paste the newspapers and other layers to the Kraft paper! Great idea, right? I got right to work.

My supply list was fairly simple--6 rolls of Kraft paper (got them at the Dollar General); newspaper; scrapbook paper; wall adhesive; razor blade; staple gun and tons of staples.


I decided to staple the Kraft paper directly to the wall vs. wallpapering it to the wall. With this method the entire project could simply be ripped down when I get tired of it. It was easy to staple up the Kraft paper. I simply held it even at the top and started stapling. I stapled down the center first, so I could smooth the paper out toward each side as I worked. It only took about 40 minutes to get the walls lined.

Now came the newspaper layers. When I started looking through my local paper, I realize that they use an awful lot of colored ink nowadays. That's not the look I was going for. So I drive to the drug store to get a copy of the Wall Street Journal thinking that's more black and white, right? Wrong! So I had to really scour the paper for the right pages without color. The majority of what I used was sports scores, weather map, stock exchange info, tv listings and crossword puzzle pages. I did add a few pages of cartoon funnies, for just a bit of color.

For my adhesive I had decided on liquid wallpaper paste, which I had to run out to get at the local hardware store. I buy a gallon--and open it up. It had completely turned to a soft solid and couldn't be used. So back to the store I go and bought a pourable paste instead, which I rolled on with a foam roller. As soon as I started rolling it on, I knew it was a bad idea! The paste was too liquidy and caused my Kraft paper to warp. Yikes! Back to square one. After calling Kim to cry on her shoulder, we decided that spray mount/spray adhesive might work. Luckily I already had a can because now it's too late to go back to the store. I decide to just spray the edges of the newspaper pages and for the double spread pages I also ran a bit down the middle. Then I just lined it up and stuck it to the Kraft paper! I worked from the largest section of the wall, and moved way to the smaller part at the top of the stairs.

After the newspaper layer was done, I used vintage dictionery pages; other old book pages with interesting images on them; coordinating scrapbook paper; sheet music; S and H green stamp book pages; my son's report card; a science paper he had from school with a 100% score; and other paper memorbilia.


I really like the finished product. I'll warn you though, having the layer of Kraft paper does not give you a perfect finish, as far as how "flat" it lays against the wall. There are some  areas that aren't totally flat--but that doesn't bother me. If you're a fanatic, you might want to spray mount your paper items directly to your wall....but remember, at some point, you might want to take them down--and who wants to do all that scraping?

I'll leave you with some before and afters of each view...


Saturday, February 11, 2012

Mirror, mirror on the wall...

Simply stated, I love mirrors. Period. I love huge, ornate wall mirrors. I love tall mirrors tipped against a wall or propped on top of a cabinet. I love vintage hand mirrors. I don't know what it is about them, but whenever I see one at a sale, I'm always tempted to buy it...and usually do! On Friday my husband and I bought a few items for the summer barn sale: three buffets, one vintage dressing table, one secretary, and you guessed it...a wall mirror. Now, I bought it with the intent to re-sell...but you can probably guess what I did. Yep. I brought it in my house and propped it up on a small 2 drawer chest in the family room.

I love how mirrors can help make a small room seem larger--and increase the amount of light in the room. I have a very dark house...huge oak and hickory trees overhang all sides + extremely wide overhangs on the house = no direct sunshine in my rooms! So I need all the help I can get.

I was just going to show the one I bought this week, but decided to show all the big mirrors in my house...maybe you'll be inspired to prop one somewhere unexpected.  Enjoy!

So, here she is...with a triple layer gold gilded frame. Sometimes I like mixing gold and silver in the same vignette...you'll also see here the vintage lampshade that Kim from Serendipity and I made a few weeks ago during our girls weekend. I finally got out and bought an Edison lightbulb for it.


Isn't the detail on the mirror lovely? Not only did I pair gold and silver together, I added a copper tray too. I love my new Morel mushroom--I got it during my weekend I stayed with Kim at the florist in downtown Claredon Hills, Illinois. My husband is a morel hunter of sorts, so it was my gift to him.


You'll notice that I also love birds nests. I tuck them in everywhere. This one is nesting in a vintage brown transferwear cup and saucer.


Now, on to the front hall. If you know me at all, you know that I change my furniture around like some people change pants. This chest dresser has literally resided in every room of my house except the bathroom. And that's only because it won't fit in there! It now holds all our hats and mittens and a few games. This mirror was purchased from my friend Joan at Possessions many years ago. It weighs a ton and it also has found a home in almost every room of the house, from above the fireplace to tipped on a dresser to standing against the wall on the floor. I like to layer mirrors with framed prints and empty frames. It gives a nice depth to the display.

 This little plaster lady is the base of vintage lamp. No one bought her at last summer's sale, so I brought her in the house. You may wonder why there are longhorn steer horns in a room with shabby romantic items? Because that's how I am! And they are a reflection from the living room opposite this mirror...so technically not in the same room! That's another one of my many collections...steer horns...we have four pairs!


I have a soft spot for cloches...and here's another nest with a "real" butterfly landed on it. I found her dead on my deck a few summers ago and couldn't just sweep her up...so I kept her.
This very cool vintage lamp is the one I posted a year ago on my Nellie's Barn Sale facebook page--that I treated myself with for my birthday!! It also has moved around the house. The vintage wraught iron ceiling fixture in the mirror reflection was purchased at from Judy at The Empty Attic when she first opened seven years ago.
Isn't she gorgeous?

Now we move to my bedroom. This fun wall mirror was purchased at a garage sale last year but was a nasty gold--so I mixed up some turquoise paint and dabbed it on over the gold. It's just leaning against the wall. My dresser was purchased from Nancy at Second Hand Rose several years ago when she and I had booths in the same shop. She now has her own store which is a must visit!

You can see the fab detail it has...


This dresser is also in my bedroom. It was one of several pieces we received for FREE from a lady who is a tenant in my stepsons' apartment building! It's a gorgeous piece of furniture complete with candles holders, original skeleton key and hand written notes on the bottom of the drawers that are from 1909! Treasures like these make me wonder why people spend thousands of dollars for pressboard pieces from Slumberland or Ashley Furniture when they can spend few hundred (and many times less) on better built pieces with history!
 The lamp is from a cute shop in Gulf Shores, Alabama when vacationing there several years ago. And the hydraenga is from my yard.The vintage ink bottle comes from a bucket of old bottles in my garage...my husband works for the local sanitary district and finds old bottles, jewelry, and coins all the time when they're digging.


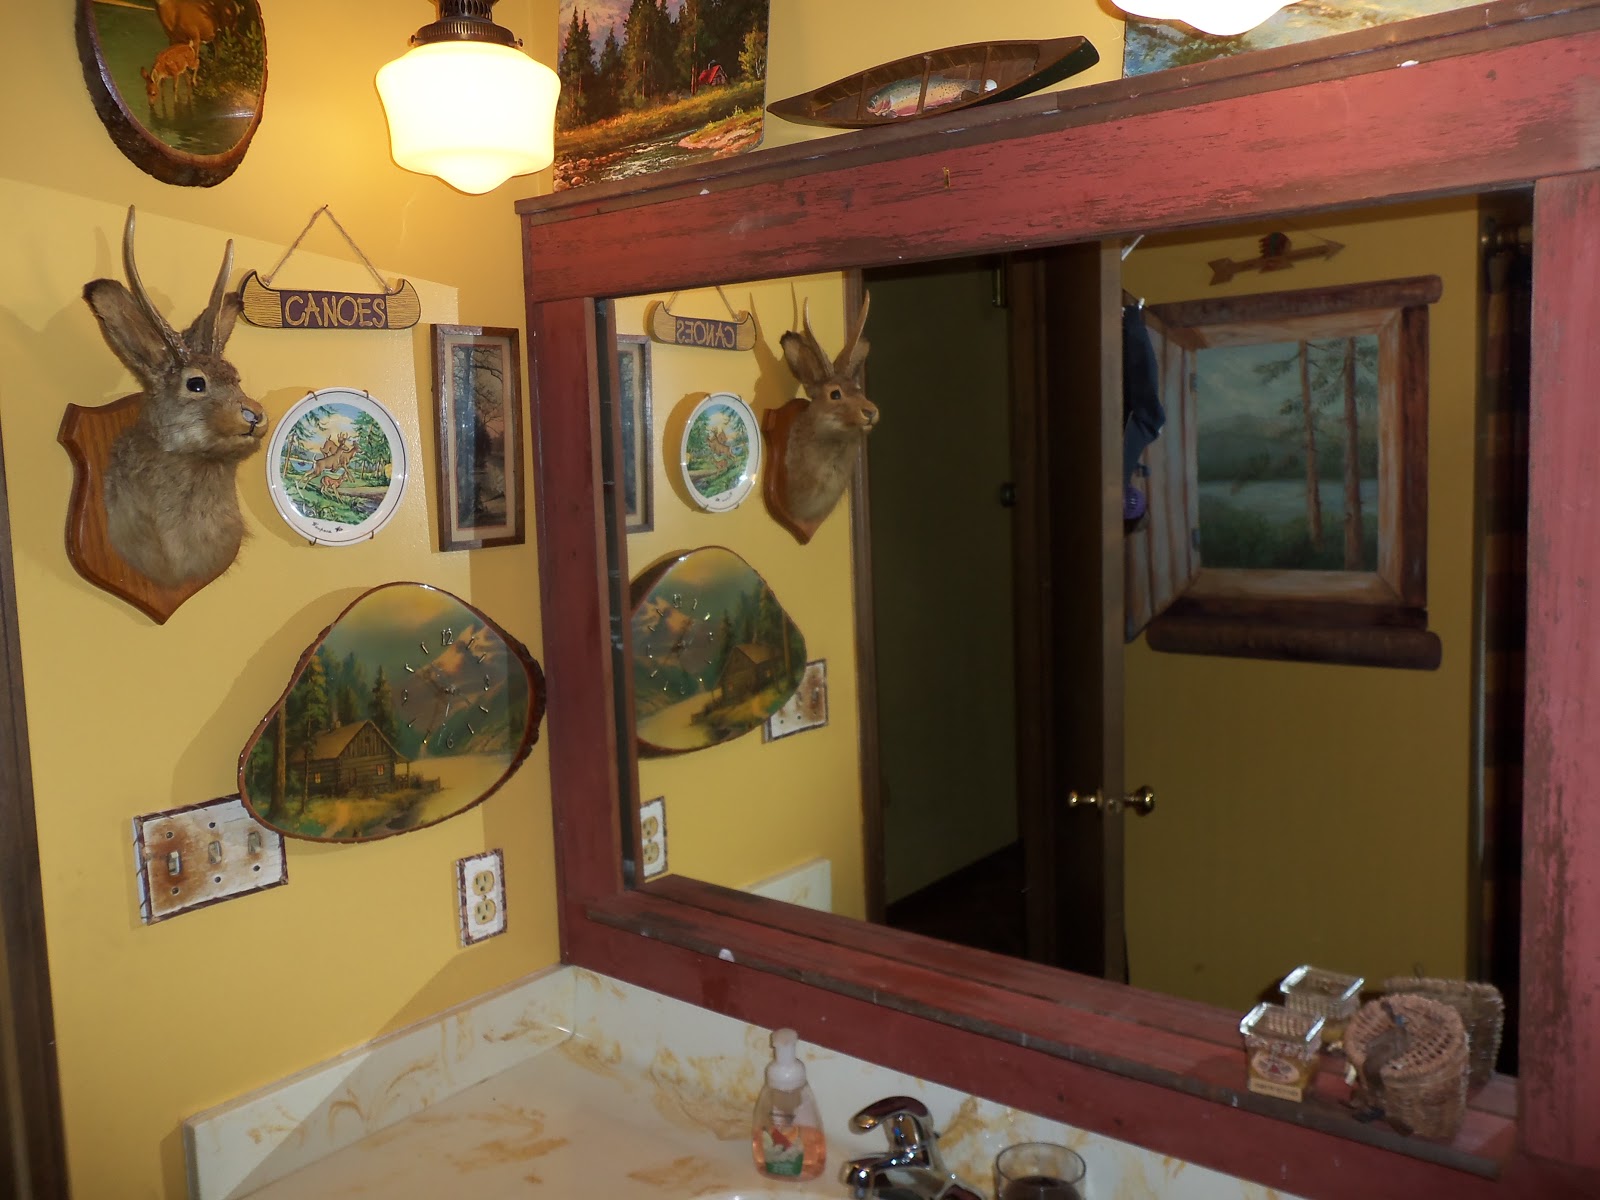
Next is the main bath--a room I'm planning to completely overhaul very soon (if I can ever make up my mind on which vanity to purchase)! It is also my son's bath, hence the eclectic collection of vintage northwoods decor. Yes, that's a Jack-a-lope on the left and a mounted deer head above the toilet on the right! As you can see, there are no rules in my house when it comes to decorating. That's an old metal kitchen cabinet next to the sink. I have no closet in this room, so it's where we hide everything from band aids to medicine to cleaning supplies. Back to the mirror. This is the original 1977 contractor special that was installed when the house was built. You know the gig...big, flat, ugly, plain...need I say more. I had my carpenter brother use some old fence boards to frame out the plain glass, with a slight shelf on top and above faucet.


This large mantel mirror sits on my buffet in the dining room. Not everything in my house is old. This mirror is from TJMaxx--the other place I shop when I'm not junking! I hate putting holes in the wall, especially for something that weighs so much. It's easier to simply set in on a piece and lean it against the wall. But I always use small pieces of non-slip mat between the mirror and cabinet so it doesn't slide out and fall.


 Well, that's the tour of mirrors! Now run out to your local junk shop, antique mall or thrift store to get yourself one...or two...or three!